← Partner Portal help · Leer en español
For vendors PREVIEW
How to send a company your bills, follow each one until you are paid, and send your W-9 and get your 1099.
New to the portal? Start with signing in. Your menu has Home, Bills, Send a bill, Payments, Tax forms, Messages and Profile, plus Agreements or Requests when the company uses them.
Home
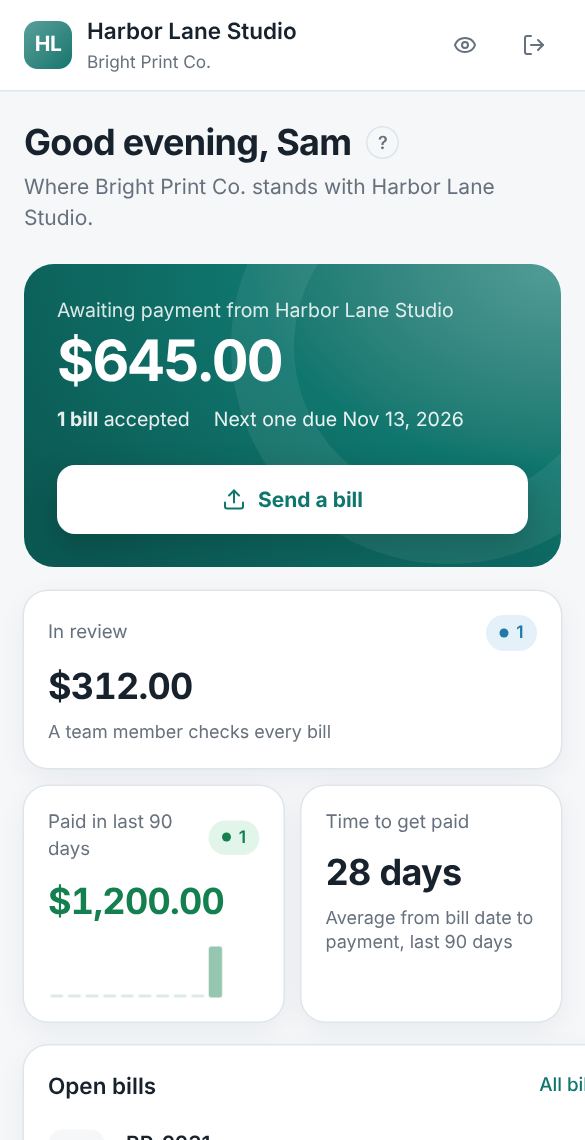
Home greets you by your first name and shows where your bills stand:
- Awaiting payment: bills the company has accepted and not paid yet, and when the next one is due.
- In review: bills the company's team is still checking.
- Paid in last 90 days, and Time to get paid: the average time from bill date to payment.
- Open bills: your latest open bills. When an upload couldn't be read or wasn't accepted, the list is called Needs your attention and shows those first, so you can fix them.
- Recent activity: bills received, invoices uploaded and payments sent to you.
Links at the top lead to your signed agreements and Send a request, when there are any. On a phone, Home also leads to your payments.
If the company takes appointments, Book an appointment opens its booking page.
Sending a bill
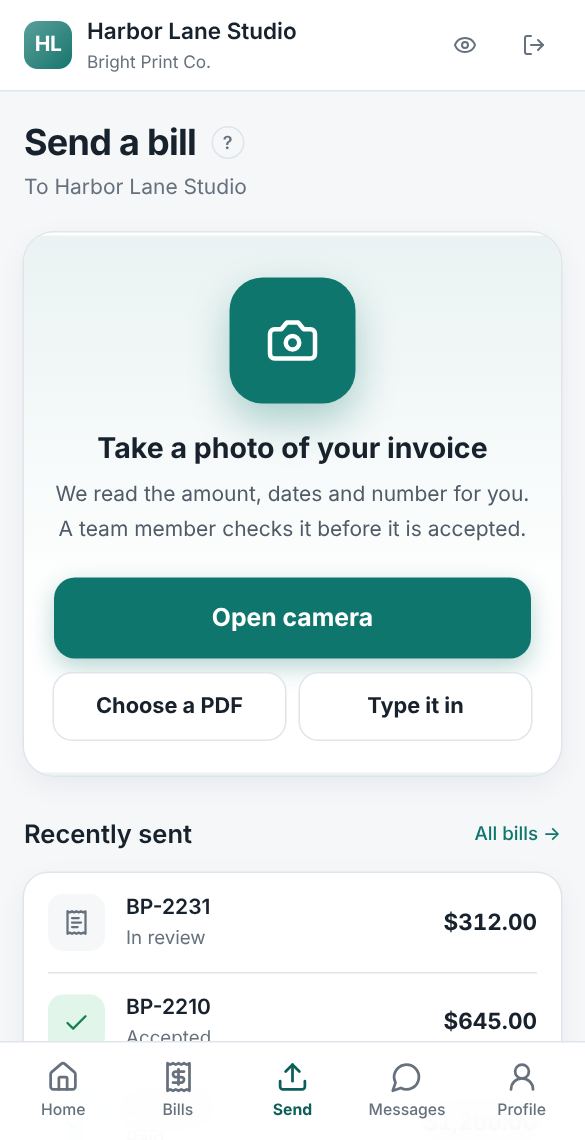
Only send bills that are not for a purchase order. Bills for a purchase order the company placed with you are created from that order on their side, so you don't need to send those.
Send a photo or PDF (when the company offers it):
- Select Send a bill. On a phone, Open camera takes a photo of your invoice; on a computer, drop the file on the page or choose it.
- Send a PDF, or a JPG or PNG photo, up to 10 MB.
- The portal reads the amount, dates and number for you. The upload shows as Uploaded, in review until a team member checks it and records it as a bill.
Type it in:
- Select Type it in (on the upload page) or go straight to the form if the company doesn't take uploads.
- Add your bill number (optional), the bill date, the due date and a note to the team if needed.
- Add a line for each charge: description, quantity and price. + Add line adds more. The total updates as you type, and the form lists anything still missing.
- Attach a copy if you have one (PDF, PNG or JPG), then select Send bill.
If sending fails, your entries stay on the page so you can try again. Switching between upload and the form keeps what you typed.
Following your bills
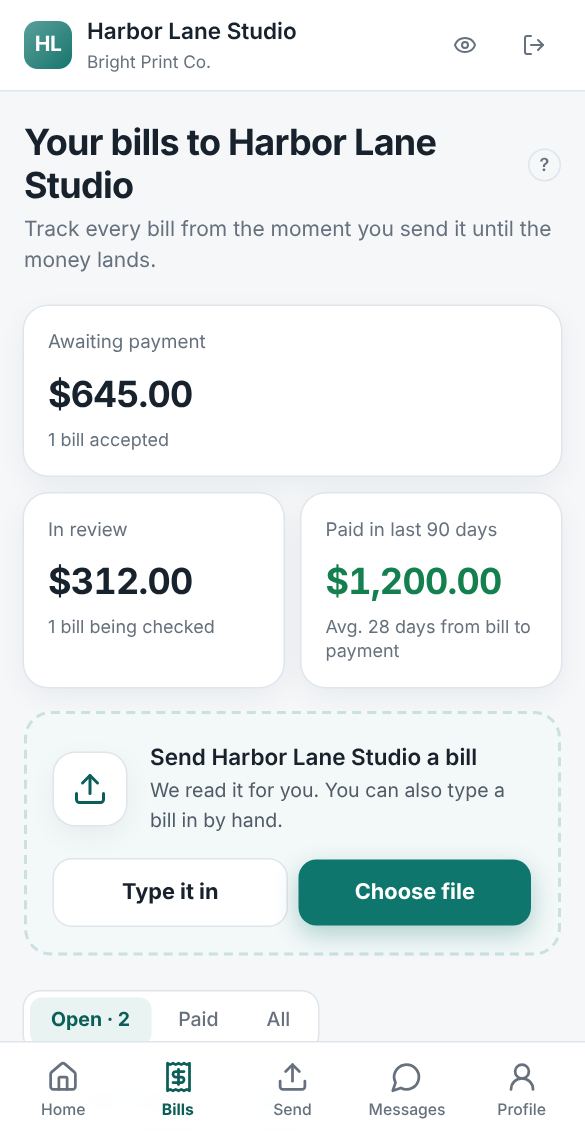
Bills lists every bill you've sent, and the ones the company recorded for their purchase orders. Search by bill number or amount. Each bill moves through four steps:
- Received: the company has it.
- In review: their team is checking it before it is approved for payment.
- Accepted: approved and awaiting payment, with the date it is scheduled to be paid by.
- Paid: the money was sent. A bill paid in parts shows Part paid and how much has been paid so far.
An upload can also show Couldn't be read: use Fix it to upload a clearer copy or type the bill in. Not accepted means the company won't record it; use Ask why. A Cancelled bill won't be paid; message the company if that looks wrong.
Message us about this bill opens that bill's conversation. See Messages.
Payments to you
Payments lists every payment the company has sent you, grouped by month, with the bill it was for, the method, and any reference such as a check number. At the top are what you were paid this year, what is still awaiting payment, and your average time to get paid.
Tax forms and your 1099
Tax forms is where you send the company your Form W-9 and get your Form 1099-NEC or 1099-MISC. On a computer it is in the menu. It isn't in a phone's bottom bar: open it on a computer, or from the link next to your tax ID in Profile once you have sent a W-9 or the company sends you 1099s.
Filling in your W-9
The company needs your legal name, tax classification and taxpayer identification number (TIN) to report what it pays you to the IRS. The top of the section shows the tax ID on file (only its last four digits), or "No tax ID on file yet."
- Select Fill in a W-9 (or Send a new W-9 when one is on file). Your name and address on file are filled in for you.
- Name (as shown on your income tax return): line 1 of the W-9. A sole proprietor enters their own name. Add a Business name or disregarded entity name, if different.
- Choose your Federal tax classification: individual or sole proprietor, C or S corporation, partnership, trust or estate, an LLC taxed as a C corporation, S corporation or partnership, or Other (then describe it).
- Under Taxpayer identification number (TIN), choose Social Security number or Employer identification number and type the nine digits, like 123-45-6789 or 12-3456789. If you have an ITIN (individual taxpayer identification number) instead of a Social Security number, choose Social Security number and type your ITIN.
- Enter your US address: street, apartment or suite (optional), city, state and a 5-digit ZIP code.
- Read the Certification, the same statements as on the IRS Form W-9, made under penalties of perjury. If the IRS has told you that you are subject to backup withholding, tell the company before you sign.
- Type your full name under Type your full name to sign and select Sign and send.
If something is wrong, the form says what to fix, for example "That number isn't one the IRS or the SSA issues. Check it." Nothing changes on your account until the company approves your W-9. While it waits, the page shows "W-9 sent … (TIN ending in …). Waiting for approval.", and you can select Withdraw. Once it is approved, the page says so with the date, and your tax ID and address are updated. If it isn't approved, the page shows the company's reason; send a new one. For your safety the portal never shows your whole TIN, only its last four digits.
After you send a W-9, your tax ID in Profile can't be changed there any more: to change it, send a new W-9.
Getting your 1099 online
Once the company sends you 1099s, Tax forms says Your 1099 comes on paper: the company prints it and sends it to you. To get it here instead, online only:
- Read Get my 1099 online only. It covers every 1099 from the company, starting with the next one, until you withdraw. When a 1099 is ready, the email you sign in with gets a message.
- Check I can open and print PDF files on this device and type your full name.
- Select Agree, get my 1099 online.
The page then says You get your 1099 online, since the day you agreed, and no paper copy is printed for you. You can select Withdraw, send me paper at any time; it applies to 1099s not given to you yet. You can also ask the company for a paper copy at any time without withdrawing.
Downloading your 1099
While you get 1099s online, each one the company approves appears on Tax forms by January 31, as Form 1099-NEC, 2026 (or 1099-MISC), with the amount. Select Download to save Copies B and 2, for your tax return and records. They show only the last four digits of your TIN. When the portal is in Spanish, the instructions for the recipient are in Spanish; the form itself stays in English, as the IRS prints it. You also get an email that it is ready. If the company corrects a 1099, it disappears while they fix it and comes back marked CORRECTED, and you get an email about the corrected 1099. A link at the bottom of the page opens the IRS page about your form.
Agreements
When the company shares a signed contract with you, Agreements appears in the menu (on a phone, use the link on Home). It lists each contract's number, title, kind, status, signed date and start and end dates. Select Download signed copy to keep it for your records. The page is read-only; for changes, send a message.
Requests
When the company takes requests through the portal, Requests appears in the menu, and Send a request on Home. Select New request, choose a New contract or a Work order under an agreement you already have, add a short title and details (dates and budget are optional), attach up to 3 PDF or Word files of 10 MB each, and select Send request. Every file is checked for viruses; if one is refused, nothing is sent.
Each request shows Waiting for an answer, Accepted, Declined (with the company's reason) or Withdrawn. You can withdraw a request while it waits. Nothing is agreed until the company accepts it.
Profile
Keep your remit-to address and tax ID current in Profile, so payments reach you without delay. The address is where payments and mail are sent. Once you have sent a W-9, or the company sends you 1099s, your tax ID is shown read-only: change it by sending a new W-9. More in Profile.